
January In Jeneral Week 2 Recap: Bathrooms
Another incredible week of January In Jeneral has come to an end! As a little reminder, each week of January we edit, organize, and create systems for a different area of our home. If you haven’t started, it’s not too late! Take a peek at our getting started blog for everything you need to get going. With that, now that we have wrapped up our second week, let’s look over our last week’s focus: bathrooms.

Day 8
At the start of the week, we began by editing out any expired products that are stealing space in our bathrooms. This can be makeup products, skin care, medication/supplements, hair care, or any other products you store in your bathroom. Similar to how we approached closets, we want to remove all the products, categorize and sort each item, and determine what can stay and what needs to be discarded *be sure to discard unused medications safely.* When it comes to beauty products, I recommend checking the bottom of the container (often the expiration date is labeled in fine writing). If you can’t find an expiration date on any cosmetic, I love to use the Check Fresh site for any cosmetic’s timeline. You can also take a peek at the graphic below for a general rule of thumb. Once you have safely discarded any expired products from your inventory, the second layer of editing is deciphering which products are currently serving you. With each item, I encourage you to ask yourself, is this something that benefits you and your life right now. If not, it’s time to donate or discard. If you still have questions about purging bathroom products, make sure to read our blog on Smart Tips For Organizing Your Beauty Products.

Day 9 & Day 10
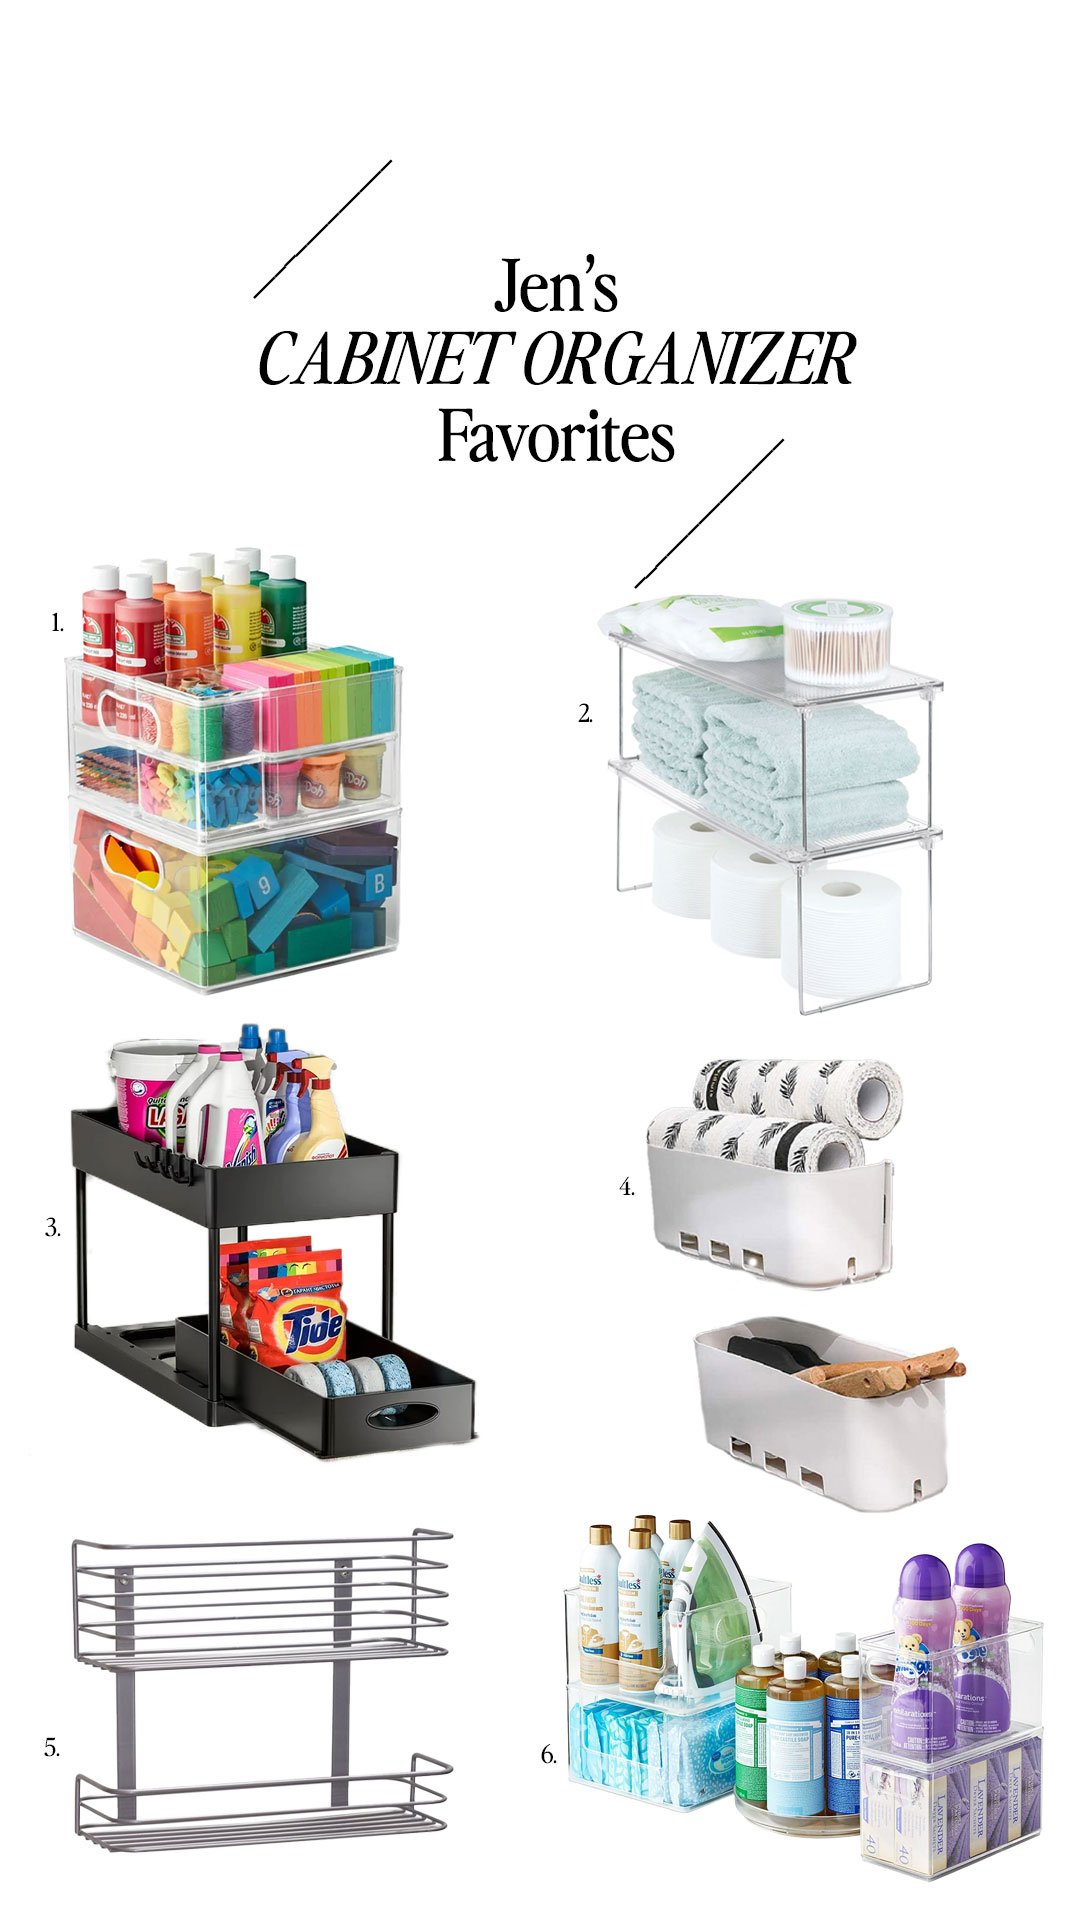
Once we edited down our bathroom essentials, we used day 9 and day 10 to create systems and structure for our bathroom drawers and cabinets. As you’d imagine, this all starts with the removal of the products. Make sure to double check all the expiration dates, just in case you overlooked something. As a pro tip, I also like to keep a pad of paper near me so I can note to order any products I am almost out of #worksmarternotharder. Now it’s time to sort all your inventory into different categories. The categories you choose have to make sense to you, your space, and your lifestyle, but some that you might use would be makeup, skin care, hair, female hygiene products, medication, etc. Once you’ve completed this, it’s time to decipher what products will support your space. This can be tricky because we are all working with different sized drawers and cabinets. Some of us have deep drawers vs shallow drawers, big cabinets but no drawers, etc. What’s fortunate, is there are so many incredible organization items that work with any space, size, and budget. Here are a few of my favorite organizers for drawers and cabinets.

Bamboo Drawer Dividers - $26
Museum Gel - $19
Acrylic Bin Organizer - $12 (each)
Pending on the organization products you use, make sure to take time to label it all. If you are a visual learner, make sure to take a peek at our bathroom restock reel for my steps to organizing my bathroom drawers.
Day 11
On day 11, we started to focus on the dreaded under the sink area. I have found that the under the sink area is generally the space that holds most of the clutter and hodgepodge products. Don’t you worry though, the days of hectic under-the-sinks are over! As we do any other area, begin by removing any products under your sink currently and wiping down the space. Since we have already purged any expired items in your bathroom, all you will have to do is discard anything you are no longer using (whether that’s shampoo, cleansers or anything else). From here, it’s all about puzzle piecing different organization products that will store your under-the-sink necessities. I, personally, love Lazy Susans for bottles and stackable drawers for items like back storage and female hygiene products. Gentle reminder that this is not a one size fits all process, it’s important to have time with storing products in different ways, until you find the system that fits you! If you are hoping for a little inspiration, make sure to watch our recent reel on organizing under the sink. As the final step to transforming under-the-sink, label everything! It only takes a few minutes and I swear it’s a game changer for saving time looking for everything and restocking items.
Day 12
As our grand finale for bathrooms, we gave a little TLC to our medicine cabinets. If you haven’t already, make sure to look at my blog post on Medicine Cabinets 101. It will give you a thorough and detailed guide to having a medicine cabinet that’s aesthetic and efficient. As a quick overview, a medicine cabinet looks different for everyone. Whether it’s a traditional medicine cabinet, or a designated area for your health and hygiene essentials, it’s important we give this space a little extra time. Just like any other space, begin by removing the products inside and wiping down everything. I know I sound like a broken record, but especially with medication, supplements and vitamins, double check those expiration dates. Like I mentioned before, everybody’s medicine cabinet looks different. Some are large enough to hold an individual’s entire skin routine, some can fit a toothbrush and toothpaste at max. I say all this because the sorting step will vary based on the size and space you are working with. If your medicine cabinet is a little larger, your categories might look something like skin care, hair care, oral care, medicines/vitamins, makeup, first aid, or feminine care. If you are working with a smaller space, I encourage you to view this area as prime real estate. Considering it is likely in an accessible and convenient area, choose categories/items that you use most often. For example, oral care and medication/supplements. From here, edit out any other products that no longer spark joy in your life. My favorite step comes next, which is to unbox and contain. I love the aesthetic of clean and uniform packaging. In my opinion, it’s the easiest way to elevate a space (it also tends to save room when you get rid of the bulky packaging). For some of my favorite medicine cabinet organization containers, take a peek here. You have probably already guessed the final step, but especially when it comes to medication, label the names and expiration dates immediately.
Now that we have reviewed all the details to this last week, let’s go over some of the questions you had for me on closet organization:
“I have no bathroom drawers! Only big under-the-sink cabinets”
No drawers, no problem! Everybody has a different structure of their bathroom and if you are only working with cabinets, you can still work your magic. I love adding stackable drawers under the sink, especially if you don’t have drawers already in the bathroom.
“Deeper drawers becoming a pit of random products!”
No space is too awkward and can’t be solved. Make sure to unbox everything. Bulky boxes can sometimes make everything look a little chaotic. Fortunately, there are so many organization containers that work for any sized space. Since you have deeper drawers, zone everything. Have an area for just cosmetics, a different area for hair, etc. I love these deep drawer modular containers for separating everything.